


Hi All!
So this post has been a long time coming and I’ve spent the last week banging away at my environment to get it up to spec.
I’m going to approach this article like I would a standard design engagement:
- list my requirements, risks, assumptions & constraints
- create a conceptual, logical and physical design for my homelab
- walk through the creation bits sequence
Requirements
- Can run a 3 VLAN lab with at least 6 VMs per VLAN
- Can be somewhat portable (i.e. can be moved to different parts of the house without rewiring)
- Low power consumption when idle
- Doesn’t incur wife aggro 😉
- Storage solution will also be the NAS for the house, so it must be flexible
Risks
- Wife aggro 😉
Assumptions
- All licensing needs will be provided by vExpert NFR licenses
- The existing home router will be sufficient to meet the needs of the new lab
Constraints
- Budget of $3,000
- Power needs of the homelab cannot exceed what 1 circuit in the house can provide
- Existing Linksys E4200 router
Conceptual design
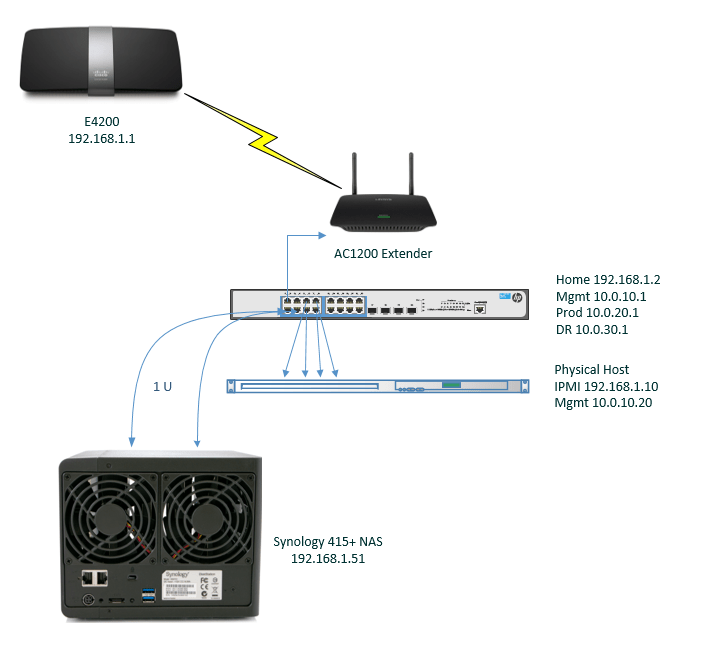
The main house router will be the focal point of connectivity between the HomeLab networks and the rest of the world. To maintain mobility, I will us a range extender mounted to the top of the quarter rack, this will connect my home subnet to the quarter rack without needing CAT6, so the only wire running out of the rack is 1 power cable.

Logical Design
The main house router (192.168.1.1) will be the focal point of connectivity between the HomeLab networks and the rest of the world. To maintain mobility, I will us a range extender mounted to the top of the quarter rack, this will connect my 192.168.1.x subnet to the quarter rack without needing CAT6, so the only wire running out of the rack is 1 power cable. From the HomeLab switch I will carve out 3 VLANs: Mgmt, Prod & DR. All 3 VLANs will have full access to each other and the home network. Mgmt will house AD & IPMI (KVM) access to the physical hosts. Prod & DR will each house 1 vCenter and 3 ESXi hosts. Extra special thanks to Jonathan MacPhee for helping me with the networking bits 🙂

Physical Design
Here is the list of materials:
- Quarter Rack
- Linksys E4200 Wireless router (not a part of my budget for this design)
- Linksys 6500 Range Extender
- HP 1910 16 port 1GB switch
- Synology 415+ NAS
- CyberPower CP1000 UPS
- CyberPower RackBar Surge rack mountable PDU
- TinkerTry’s 1U SuperServer (I haven’t spoken much about this but OMG it’s AMAZING!!! Paul Braren has done a fantastic job of showcasing this machine). I went with 128GB and an internal 256GB M.2 SSD for high I/O workloads
Because I’m using ONE SERVER for all of this, my physical NICs will be carved up so that 2 are running on the Mgmt VLAN, and the other 2 will be running Prod and DR together:


How-to
-
Assemble all the bits 😉
- Plug all 4 NICs from the Physical host into the switch
- Plug IPMI (KVM) Ethernet port from the Physical host into the switch
- Configure Range Extender to extend your home subnet range (192.168.1.0 /24)
-
Configure switch to us 192.168.1.2 as its management interface & create VLAN interfaces for the 3 additional VLANS:

-
Configure static routes on the router to forward 10.0.0.0 packets to the switch:

-
Configure static route on switch to default to the home router for non “10” traffic:

-
On switch, set all ports to “tagged” for VLANs 10, 20 & 30
- Leave VLAN 1 “untagged”
-
Install ESXi 6.0 U2 on the physical host. Configure it with the above IP range and confirm that you can see it from the home network:

- From the web interface, install Windows 2012R2 and configure AD & DNS (for me it was mistwire.local)
-
Update DNS with all of the A records for your environment:

- Install your first vCenter in the Prod VLAN
- Create 3 Datacenters: Physical, Prod & DR
-
Import your physical host into the “Physical” datacenter:

- Start building nested ESXi hosts! (I used William Lam’s preconfigured Nested ESXi ova and highly recommend it as it takes care of the changes that need to be made in a nest ESXi host)
- Once you’ve created your ESXi hosts in the Prod and DR subnets, add them to the local vCenter on its respective VLAN
Your VCSAa, ESXi hosts, and anything else you add should be able to see all 4 VLANs. Next steps (not necessarily in order):
- vRO
- vRA
- vSphere Replication
- SRM
- vROps
- LogInsight
- Establish VPN connectivity to my AWS VPC!
Cool, can you give more details on the quarter rack
Sure Russ, I wrote an article about it 🙂
https://mistwire.com/2016/01/new-quarter-rack-for-the-homelab/
https://mistwire.com/2016/01/more-homelab-stuff/